Our #1 PRO Tutorial ever is now on Sale! https://phlearn.com/popular
How to Style Hair in Photoshop
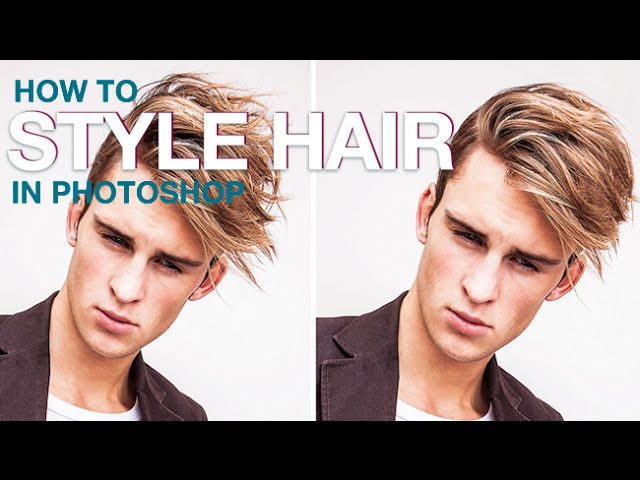
From flyaways to frizzies, hair seems to never do exactly what we want it to. Learn how to shape and style hair in Photoshop in today’s episode!
How to Shape the Hair
The liquify tool will allow you to push and pull pixels. This is really great, but you never want to do this directly on the background layer. So, duplicate the background layer and work from that one. Then go to ‘Filter – Liquify’ to bring up the Liquify dialogue.
The only tool you really need to use for shaping hair with Liquify is the Forward Warp Tool in the upper left corner. You will notice there are many options for size, pressure, density, etc. (If you are not seeing those options, click on Advanced). For hair, we use a density and pressure of about 25.
The size you should use varies greatly from photo to photo; you don’t want it to be too small and make a harsh warp trail, but you also don’t want it too large because it will move much more than you’d like. Play around with what size works best for the hair in your photo. Ctrl/Cmd + Z is your friend here!
We use this forward warp tool to push the hair down into a more orderly style. It makes the look a little more cohesive and “put together”.
As you can see, the liquify tool does the majority of the work!
How to Clean Up Flyaways
Next up is clean up! First, create a new layer. we have some residual hair floating above the model’s head, so we use the clone stamp tool to get rid of that. This works for flyaways as well! The hardness of our brush is around 85% so that it’s not too fuzzy.
To clean up the little light hairs that cross over dark hair and look distracting, create a new layer and use the clone stamp tool. The difference here is: change the Blending Mode from Normal to Darken. This magic technique gets rid of those light areas as soon as you paint over them! This can be tedious, but you can spend as much or as little time on this as you want.
How to Fill in Blank Areas
Create a new layer and use the clone stamp tool to paint in another copy of just the hair. Then, bring in that new hair over on top of the actual hair. Then, add a layer mask and paint with white in the area that you want to fill in.
By default, layers and layer masks are linked together. But, you can unlink the two and move each one separately. To do this click on the little chainlink that appears between the layer and the mask. Then, select just the layer and you will see how easy it is to move just the new hair around! You can even use the Transform tool (Ctrl/Cmd + T) to rotate or adjust the hair inside of that blank area.
One more technique for styling the hair is creating more copies of the hair with different blend modes.
———————————————————————————————-
VISIT PHLEARN.COM FOR MORE FREE TUTORIALS
SUBSCRIBE TO OUR CHANNEL FOR MORE FREE TIPS AND TRICKS
http://www.youtube.com/subscription_center?add_user=phlearnllc
GET FREE TUTORIALS IN YOUR EMAIL + DISCOUNTS ON OUR PRO TUTORIALS!
https://phlearn.com/mail
BUY THE TABLET AARON USES! https://phlearn.com/tablet
LET’S BE FRIENDS!
Instagram ► https://www.instagram.com/phlearn/
Facebook ► https://facebook.com/phlearn
Twitter ► https://twitter.com/phlearn
Google+ ► https://plus.google.com/116791098059215639405
Phlearn ► https://phlearn.com
———————————————————————————————-
Stock Images provided by: http://us.fotolia.com/