Home Graphic Photoshop How to Remove a Tattoo in Photoshop

How to Remove a Tattoo in Photoshop

Learn to Retouch Like a Pro: https://phlearn.com/rtremovetatoo

Our #1 PRO Tutorial ever is now on Sale! https://phlearn.com/popular

How to Remove a Tattoo in Photoshop

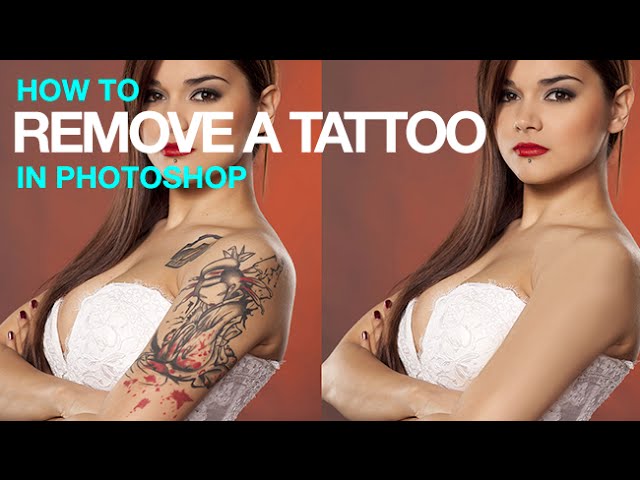
“Do you think we got any bloopers..?” I don’t know, you tell us! And learn how to remove a tattoo in Photoshop while you’re at it.

Basic Removal

For this first step, we use the Spot Healing Brush Tool. Be sure that this tool is set to the Normal Mode, and that the Type is set to Content Aware. Sample All Layers should also be checked.

On a new layer, paint right over top of the tattoo. It’s that simple! This works best if you do small sections at a time, making sure to include part of the original skin texture in your section. Sometimes the tool will pull areas from other parts of the photo that do NOT belong on skin! If this happens, don’t worry at all. All you have to do is paint right over it again.

After spending some time with this tool the skin will look blotchy and uneven. As explained in the episode, you might get the “toaster oven” effect. But, as long as the ink is gone, you are ready to move on to the second step!

Painting the Skin

Retouchers are also painters! It’s time to bring out those paint brushes.

In this very important step, we will be sampling the skin and painting over the blotchiness that is left over from step one.

Select the brush tool and use a soft round brush. The size of the brush will depend on the area of the skin that you are working on, and also will take a little bit of trial and error.

To paint, sample a color of the natural skin by holding alt/opt and clicking on it. Then, your brush will pick up that color and you can paint over the uneven skin. This will take some practice so that the body doesn’t look completely flat! Just remember that highlights, shadows, and midtowns should all be paid attention to and treated differently. Look for the shadows and how they fall onto the skin – sometimes it is just a small detail but it can make all of the difference. For this example, we bring each tone all the way up the arm and into the shoulder.

Remember that this is a gradual and gentle process. Set the Flow of your brush to be very low – somewhere between 5 and 20 percent is a good place to start. With a low flow, you are able to slowly build up the color of the skin. This helps to make it look more natural.

Adding Skin Texture

After painting over the skin, it will look much too smooth and artificial. Step 3 is adding skin texture back into the image so that it looks completely normal.

Start by making a new layer and selecting the area around the body part you have been working on. Then, go to Edit – Fill – 50% Gray. Change the Blend Mode from Normal to Overlay. This is the base layer for the texture.

Now, go to Filter – Noise – Add Noise. Change the settings depending on what looks best for your image. We choose to select Uniform.

To add to the look of the texture, go to Filter – Blur – Gaussian Blur. We add just a touch of blur (about 1 pixel).

Now, go to Filter – Stylize – Emboss. This is where the texture will really turn from just looking like noise to looking like skin! Go for an amount that makes it look as natural as possible.

Lastly, create a black layer mask on your current layer. Then, use the brush tool to paint with white where you’d like the skin texture to show up. You can use a low flow or opacity to build it up gently if you’d like.

———————————————————————————————-

VISIT PHLEARN.COM FOR MORE FREE TUTORIALS

Homepage

SUBSCRIBE TO OUR CHANNEL FOR MORE FREE TIPS AND TRICKS
http://www.youtube.com/subscription_center?add_user=phlearnllc

GET FREE TUTORIALS IN YOUR EMAIL + DISCOUNTS ON OUR PRO TUTORIALS!
https://phlearn.com/mail

BUY THE TABLET AARON USES! https://phlearn.com/tablet

LET’S BE FRIENDS!
Instagram ► https://www.instagram.com/phlearn/
Facebook ► https://facebook.com/phlearn
Twitter ► https://twitter.com/phlearn
Google+ ► https://plus.google.com/116791098059215639405
Phlearn ► https://phlearn.com

———————————————————————————————-

Stock Images provided by: http://us.fotolia.com/

Comments

comments

Latest articles

Easy Ways to Select Artwork in Illustrator | Adobe Creative Cloud

Explore a variety of methods for making selections in your projects to make creating and editing faster and easier in Adobe Illustrator. To download the sample files and learn more about Artwork selection methods, click on https://adobe.ly/2AXMTv1 Subscribe: https://www.youtube.com/user/adobecreativecloud?sub_confirmation=1 LET’S CONNECT Facebook: http://facebook.com/adobecreativecloud Twitter: http://twitter.com/creativecloud Instagram: http://www.instagram.com/adobecreativecloud/ Adobe Creative Cloud gives you the world's best creative apps so you can turn your brightest ideas into your greatest work across your desktop and mobile devices.

Transform Artwork Freely in Illustrator Using Puppet Warp | Adobe Creative Cloud

Learn how to transform artwork using the Puppet Warp and Free Transform tools in Adobe Illustrator. To download the sample files and explore more tutorials on Artwork selection in Illustrator, go to https://adobe.ly/2vul87Y Subscribe: https://www.youtube.com/user/adobecreativecloud?sub_confirmation=1 LET’S CONNECT Facebook: http://facebook.com/adobecreativecloud Twitter: http://twitter.com/creativecloud Instagram: http://www.instagram.com/adobecreativecloud/ Adobe Creative Cloud gives you the world's best creative apps so you can turn your brightest ideas into your greatest work across your desktop and mobile devices.

How to Make a Custom Brush with Adobe Capture CC | Adobe Creative Cloud

Create a brush from a simple sketch. Start from scratch, or download practice files [https://learndownload.adobe.com/pub/learn/mobile-apps/make-a-custom-brush.zip] for a head start. Steps below. Prep your project: 1. Save the practice image (source-image.jpg) provided here to the Camera Roll on your mobile device, or use your own. 2. Download the Adobe Capture CC mobile app from the App Store for your iOS device, or from the Play Store for you Android. Open the app and sign in with your Adobe ID. 3. Tap Brushes from the top menu. Create a custom brush: 1. Tap Brushes from the menu. 2. Tap the image icon at the bottom, then tap Camera Roll. 3. Choose an image from your Camera Roll. 4. Tap areas to erase unwanted marks. Tap the checkmark. 5. Drag the resize handles (white dots) to position the blue box around the part of the image you want to use as the brush. 6. Tap Styles from the main menu. Tip: For the example in the video, we chose a style in the Photoshop CC & Adobe Sketch Brushes section. 7. Tap Presets. Adjust the Size, Spacing, and other settings as you like. Tap Done, or the right arrow on Android devices. 8. Choose the appropriate Creative Cloud Library. Tap Save. Apply style in Adobe Photoshop CC: 1. Open artwork in Photoshop. 2. Choose the Brush tool. 3. Choose your new brush from the Libraries panel (Window – Libraries). 4. Use the new brush to enhance your creation. That's it! To learn more about Adobe Capture and Adobe's other mobile apps, visit our Mobile apps Tutorials page. Subscribe: https://www.youtube.com/user/adobecreativecloud?sub_confirmation=1 LET’S CONNECT Facebook: http://facebook.com/adobecreativecloud Twitter: http://twitter.com/creativecloud Instagram: http://www.instagram.com/adobecreativecloud/ Adobe Creative Cloud gives you the world's best creative apps so you can turn your brightest ideas into your greatest work across your desktop and mobile devices.

Bring Dull Photos to Life Using Lightroom CC | Adobe Creative Cloud

Learn how to enhance sharpness, detail, and textures using Clarity and Dehaze sliders in Lightroom CC. Download sample files and learn more about image editing techniques in Lightroom: https://adobe.ly/2wbDUS0 Subscribe: https://www.youtube.com/user/adobecreativecloud?sub_confirmation=1 LET’S CONNECT Facebook: http://facebook.com/adobecreativecloud Twitter: http://twitter.com/creativecloud Instagram: http://www.instagram.com/adobecreativecloud/ Adobe Creative Cloud gives you the world's best creative apps so you can turn your brightest ideas into your greatest work across your desktop and mobile devices.

Comments

comments