Home Graphic Photoshop How to Transform the Body in Photoshop

How to Transform the Body in Photoshop

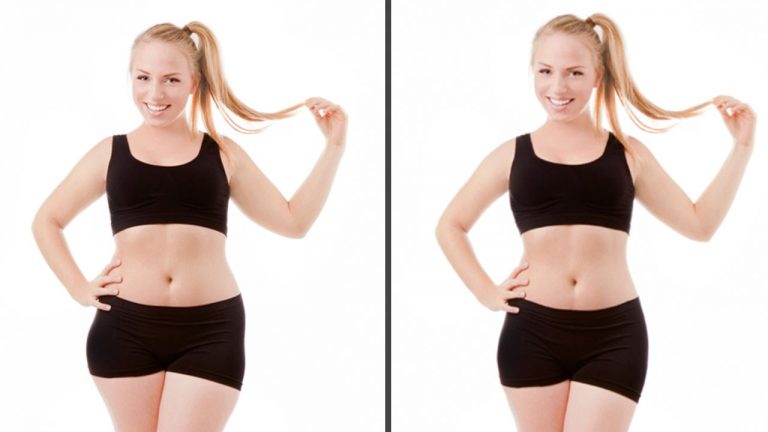
Altering a model’s body proportions is a very controversial topic. In today’s episode, we show you some techniques to get a great transformed body without pushing it too far.

Although tucking the stomach in usually comes to mind first, there are many other helping tricks for shaping bodies in Photoshop. Generally, you are going for increased height in the body. Lengthening the legs and the neck is a great subtle way to do this.

Puppet Warp

Duplicate the background layer and go to Edit – Puppet Warp. With this tool, you can create anchor points for the areas that you would like to stay in place. For this image we create points on her hips and then on the outsides of her feet. Then, we can pull the feet down a little and stretch only the legs out.

You can use puppet warp for stretching the neck as well. Put points around her head so that it doesn’t move, and one on each shoulder. Then lift the head up to lengthen the neck.

At last, tummy slimming! We use the same puppet technique for this as well. Be careful not to over over-exaggerate this transformation.

Liquify

On a duplicate of your top layer, go to Filter – Liquify. We use the Forward Warp Tool which can be found at the top left of the dialogue, and allows you to push and pull the image. Use this tool to bring in her arms and hips a bit.
———————————————————————————————–

Thanks for watching our free Phlearn Tutorials! If you enjoyed this video be sure to subscribe to our channel to receive free weekly videos.

Subscribe: http://goo.gl/LBIEQU

For more advanced Photoshop Tutorials be sure to check out our Phlearn PRO Tutorials. We offer the best Photoshop tutorials available online starting at just $14.99.
http://phlearn.com/pro-tutorials

———————————————————————————————–

Website: http://phlearn.com
Facebook: https://www.facebook.com/Phlearn
Google+: https://plus.google.com/u/0/116791098…

Comments

comments

Latest articles

Easy Ways to Select Artwork in Illustrator | Adobe Creative Cloud

Explore a variety of methods for making selections in your projects to make creating and editing faster and easier in Adobe Illustrator. To download the sample files and learn more about Artwork selection methods, click on https://adobe.ly/2AXMTv1 Subscribe: https://www.youtube.com/user/adobecreativecloud?sub_confirmation=1 LET’S CONNECT Facebook: http://facebook.com/adobecreativecloud Twitter: http://twitter.com/creativecloud Instagram: http://www.instagram.com/adobecreativecloud/ Adobe Creative Cloud gives you the world's best creative apps so you can turn your brightest ideas into your greatest work across your desktop and mobile devices.

Transform Artwork Freely in Illustrator Using Puppet Warp | Adobe Creative Cloud

Learn how to transform artwork using the Puppet Warp and Free Transform tools in Adobe Illustrator. To download the sample files and explore more tutorials on Artwork selection in Illustrator, go to https://adobe.ly/2vul87Y Subscribe: https://www.youtube.com/user/adobecreativecloud?sub_confirmation=1 LET’S CONNECT Facebook: http://facebook.com/adobecreativecloud Twitter: http://twitter.com/creativecloud Instagram: http://www.instagram.com/adobecreativecloud/ Adobe Creative Cloud gives you the world's best creative apps so you can turn your brightest ideas into your greatest work across your desktop and mobile devices.

How to Make a Custom Brush with Adobe Capture CC | Adobe Creative Cloud

Create a brush from a simple sketch. Start from scratch, or download practice files [https://learndownload.adobe.com/pub/learn/mobile-apps/make-a-custom-brush.zip] for a head start. Steps below. Prep your project: 1. Save the practice image (source-image.jpg) provided here to the Camera Roll on your mobile device, or use your own. 2. Download the Adobe Capture CC mobile app from the App Store for your iOS device, or from the Play Store for you Android. Open the app and sign in with your Adobe ID. 3. Tap Brushes from the top menu. Create a custom brush: 1. Tap Brushes from the menu. 2. Tap the image icon at the bottom, then tap Camera Roll. 3. Choose an image from your Camera Roll. 4. Tap areas to erase unwanted marks. Tap the checkmark. 5. Drag the resize handles (white dots) to position the blue box around the part of the image you want to use as the brush. 6. Tap Styles from the main menu. Tip: For the example in the video, we chose a style in the Photoshop CC & Adobe Sketch Brushes section. 7. Tap Presets. Adjust the Size, Spacing, and other settings as you like. Tap Done, or the right arrow on Android devices. 8. Choose the appropriate Creative Cloud Library. Tap Save. Apply style in Adobe Photoshop CC: 1. Open artwork in Photoshop. 2. Choose the Brush tool. 3. Choose your new brush from the Libraries panel (Window – Libraries). 4. Use the new brush to enhance your creation. That's it! To learn more about Adobe Capture and Adobe's other mobile apps, visit our Mobile apps Tutorials page. Subscribe: https://www.youtube.com/user/adobecreativecloud?sub_confirmation=1 LET’S CONNECT Facebook: http://facebook.com/adobecreativecloud Twitter: http://twitter.com/creativecloud Instagram: http://www.instagram.com/adobecreativecloud/ Adobe Creative Cloud gives you the world's best creative apps so you can turn your brightest ideas into your greatest work across your desktop and mobile devices.

Bring Dull Photos to Life Using Lightroom CC | Adobe Creative Cloud

Learn how to enhance sharpness, detail, and textures using Clarity and Dehaze sliders in Lightroom CC. Download sample files and learn more about image editing techniques in Lightroom: https://adobe.ly/2wbDUS0 Subscribe: https://www.youtube.com/user/adobecreativecloud?sub_confirmation=1 LET’S CONNECT Facebook: http://facebook.com/adobecreativecloud Twitter: http://twitter.com/creativecloud Instagram: http://www.instagram.com/adobecreativecloud/ Adobe Creative Cloud gives you the world's best creative apps so you can turn your brightest ideas into your greatest work across your desktop and mobile devices.

Comments

comments