Home Graphic Photoshop How to Use Vector Masks in Photoshop

How to Use Vector Masks in Photoshop

Download the Sample Image Here

How to Use Vector Masks in Photoshop

How to Use Vector Masks in Photoshop
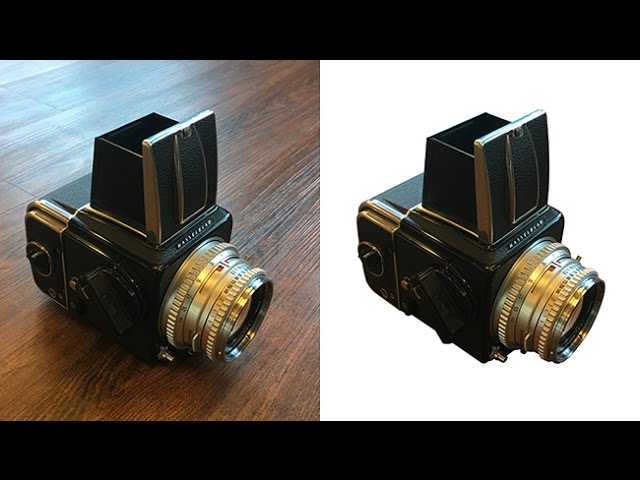
Learn how to cut any object out of its background in today’s episode featuring the Pen Tool and Vector Masks.

Vector Masks Vs. Layer Masks
When cutting an object out, you can choose between Layer Masks and Vector Masks, here are some of the key differences between the two.

Layer Masks
• Determines visibility based on pixels, not shapes.
• Paint white on a layer mask to make areas visible, black to make them invisible
• Allows filters like Blur and Sharpen

Vector Masks
• Determines visibility based on Pen Paths and Shapes
• Paths can be altered at any time, revealing different parts of an image
• Add feathering using the Properties Window

Density & Feathering
When cutting an object out of its background, it is important to be able to see what you are cutting out. When using vector masks, the subject can get hidden by the mask. To reveal the subject, open the properties window and lower the vector mask density to “see through” the vector mask temporarily.

A vector mask will cut an object out with a sharp edge, to add feathering to the edge, open the properties window and slide the Feathering slider to soften the edge.

VISIT PHLEARN.COM FOR MORE FREE TUTORIALS

Homepage

SUBSCRIBE NOW FOR MORE FREE TIPS AND TRICKS
http://www.youtube.com/subscription_c…

GET FREE TUTORIALS SENT TO YOUR EMAIL + DISCOUNTS ON OUR PRO TUTORIALS!
https://phlearn.com/mail

LET’S BE FRIENDS!
Instagram ► https://www.instagram.com/phlearn/
Facebook ► https://facebook.com/phlearn
Twitter ► https://twitter.com/phlearn
Google+ ► https://plus.google.com/1167910980592…
Phlearn ► https://phlearn.com

Comments

comments

Latest articles

Easy Ways to Select Artwork in Illustrator | Adobe Creative Cloud

Explore a variety of methods for making selections in your projects to make creating and editing faster and easier in Adobe Illustrator. To download the sample files and learn more about Artwork selection methods, click on https://adobe.ly/2AXMTv1 Subscribe: https://www.youtube.com/user/adobecreativecloud?sub_confirmation=1 LET’S CONNECT Facebook: http://facebook.com/adobecreativecloud Twitter: http://twitter.com/creativecloud Instagram: http://www.instagram.com/adobecreativecloud/ Adobe Creative Cloud gives you the world's best creative apps so you can turn your brightest ideas into your greatest work across your desktop and mobile devices.

Transform Artwork Freely in Illustrator Using Puppet Warp | Adobe Creative Cloud

Learn how to transform artwork using the Puppet Warp and Free Transform tools in Adobe Illustrator. To download the sample files and explore more tutorials on Artwork selection in Illustrator, go to https://adobe.ly/2vul87Y Subscribe: https://www.youtube.com/user/adobecreativecloud?sub_confirmation=1 LET’S CONNECT Facebook: http://facebook.com/adobecreativecloud Twitter: http://twitter.com/creativecloud Instagram: http://www.instagram.com/adobecreativecloud/ Adobe Creative Cloud gives you the world's best creative apps so you can turn your brightest ideas into your greatest work across your desktop and mobile devices.

How to Make a Custom Brush with Adobe Capture CC | Adobe Creative Cloud

Create a brush from a simple sketch. Start from scratch, or download practice files [https://learndownload.adobe.com/pub/learn/mobile-apps/make-a-custom-brush.zip] for a head start. Steps below. Prep your project: 1. Save the practice image (source-image.jpg) provided here to the Camera Roll on your mobile device, or use your own. 2. Download the Adobe Capture CC mobile app from the App Store for your iOS device, or from the Play Store for you Android. Open the app and sign in with your Adobe ID. 3. Tap Brushes from the top menu. Create a custom brush: 1. Tap Brushes from the menu. 2. Tap the image icon at the bottom, then tap Camera Roll. 3. Choose an image from your Camera Roll. 4. Tap areas to erase unwanted marks. Tap the checkmark. 5. Drag the resize handles (white dots) to position the blue box around the part of the image you want to use as the brush. 6. Tap Styles from the main menu. Tip: For the example in the video, we chose a style in the Photoshop CC & Adobe Sketch Brushes section. 7. Tap Presets. Adjust the Size, Spacing, and other settings as you like. Tap Done, or the right arrow on Android devices. 8. Choose the appropriate Creative Cloud Library. Tap Save. Apply style in Adobe Photoshop CC: 1. Open artwork in Photoshop. 2. Choose the Brush tool. 3. Choose your new brush from the Libraries panel (Window – Libraries). 4. Use the new brush to enhance your creation. That's it! To learn more about Adobe Capture and Adobe's other mobile apps, visit our Mobile apps Tutorials page. Subscribe: https://www.youtube.com/user/adobecreativecloud?sub_confirmation=1 LET’S CONNECT Facebook: http://facebook.com/adobecreativecloud Twitter: http://twitter.com/creativecloud Instagram: http://www.instagram.com/adobecreativecloud/ Adobe Creative Cloud gives you the world's best creative apps so you can turn your brightest ideas into your greatest work across your desktop and mobile devices.

Bring Dull Photos to Life Using Lightroom CC | Adobe Creative Cloud

Learn how to enhance sharpness, detail, and textures using Clarity and Dehaze sliders in Lightroom CC. Download sample files and learn more about image editing techniques in Lightroom: https://adobe.ly/2wbDUS0 Subscribe: https://www.youtube.com/user/adobecreativecloud?sub_confirmation=1 LET’S CONNECT Facebook: http://facebook.com/adobecreativecloud Twitter: http://twitter.com/creativecloud Instagram: http://www.instagram.com/adobecreativecloud/ Adobe Creative Cloud gives you the world's best creative apps so you can turn your brightest ideas into your greatest work across your desktop and mobile devices.

Comments

comments