Home Graphic Photoshop How to Whiten Teeth in Photoshop

How to Whiten Teeth in Photoshop

Our #1 PRO Tutorial ever is now on Sale! https://phlearn.com/popular

How to Whiten Teeth in Photoshop

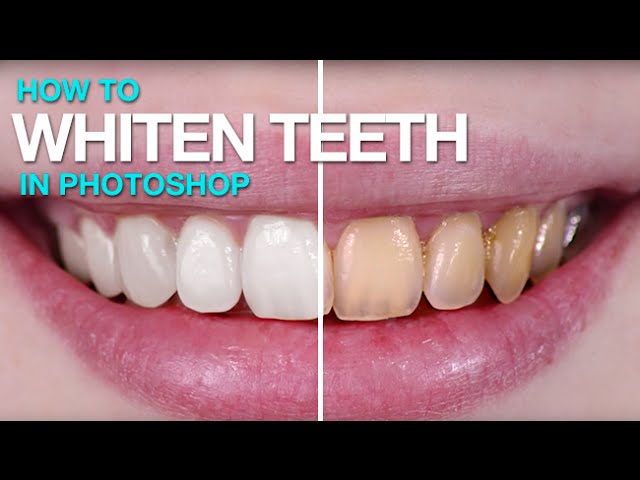
You’ve asked, we’ve answered! In today’s episode, learn how to whiten and straighten teeth in no time!

Selecting the Teeth

Make sure to start off by selecting the teeth, so they can be isolated for the color work. The initial selection doesn’t have to be perfect as you can go back in and refine the mask layer. For this specific image, we use the lasso tool.

Now that we have a selection, we want to turn it into a layer mask. Make a new layer and press CMD/CTRL + G to group that layer with itself. Then, hit the layer mask button. Now, all the changes you make will only apply to the layer mask. This is a very important step and is extremely helpful later on!

Tackling Color

Make a new hue/saturation layer mask, and drag the slider almost all the way to the left. Decrease the saturation a little bit as well. You do want to have a tiny bit of color in the teeth, because no one has completely desaturated teeth. Grey teeth would be a very scary sight.

Lightening the Dark Areas

Make a new curves adjustment layer and drag the middle of the curve very far up. At first this will look really horrible, but don’t worry! Double click on that layer and select the Blend-If window. Here, you can hold ALT/OPT and drag the bottom right slider to the left. If it goes too far though, the darkness will come back into the teeth so be sure to find a happy medium.

Lightening the Light Areas

For this step, use the marquee tool to select a box around all of the teeth. Then hit Shift + Delete and choose Fill With White. Now, use the same Blend-If technique as before but bring the left slider to the right

Straightening

If you need to straighten teeth as well, make a stamp visible layer by pressing SHIFT + OPT + CMD + E. This will be the layer that you alter the shape of the teeth on. Go to Filter – Liquify, and make adjustments with your brush as needed on the teeth.

———————————————————————————————–

VISIT PHLEARN.COM FOR MORE FREE TUTORIALS

Homepage

SUBSCRIBE TO OUR CHANNEL FOR MORE FREE TIPS AND TRICKS
http://www.youtube.com/subscription_center?add_user=phlearnllc

GET FREE TUTORIALS IN YOUR EMAIL + DISCOUNTS ON OUR PRO TUTORIALS!
https://phlearn.com/mail

BUY THE TABLET AARON USES! https://phlearn.com/tablet

LET’S BE FRIENDS!
Instagram ► https://www.instagram.com/phlearn/
Facebook ► https://facebook.com/phlearn
Twitter ► https://twitter.com/phlearn
Google+ ► https://plus.google.com/116791098059215639405
Phlearn ► https://phlearn.com

———————————————————————————————–

Image: http://www.fotolia.com

Comments

comments

Latest articles

Easy Ways to Select Artwork in Illustrator | Adobe Creative Cloud

Explore a variety of methods for making selections in your projects to make creating and editing faster and easier in Adobe Illustrator. To download the sample files and learn more about Artwork selection methods, click on https://adobe.ly/2AXMTv1 Subscribe: https://www.youtube.com/user/adobecreativecloud?sub_confirmation=1 LET’S CONNECT Facebook: http://facebook.com/adobecreativecloud Twitter: http://twitter.com/creativecloud Instagram: http://www.instagram.com/adobecreativecloud/ Adobe Creative Cloud gives you the world's best creative apps so you can turn your brightest ideas into your greatest work across your desktop and mobile devices.

Transform Artwork Freely in Illustrator Using Puppet Warp | Adobe Creative Cloud

Learn how to transform artwork using the Puppet Warp and Free Transform tools in Adobe Illustrator. To download the sample files and explore more tutorials on Artwork selection in Illustrator, go to https://adobe.ly/2vul87Y Subscribe: https://www.youtube.com/user/adobecreativecloud?sub_confirmation=1 LET’S CONNECT Facebook: http://facebook.com/adobecreativecloud Twitter: http://twitter.com/creativecloud Instagram: http://www.instagram.com/adobecreativecloud/ Adobe Creative Cloud gives you the world's best creative apps so you can turn your brightest ideas into your greatest work across your desktop and mobile devices.

How to Make a Custom Brush with Adobe Capture CC | Adobe Creative Cloud

Create a brush from a simple sketch. Start from scratch, or download practice files [https://learndownload.adobe.com/pub/learn/mobile-apps/make-a-custom-brush.zip] for a head start. Steps below. Prep your project: 1. Save the practice image (source-image.jpg) provided here to the Camera Roll on your mobile device, or use your own. 2. Download the Adobe Capture CC mobile app from the App Store for your iOS device, or from the Play Store for you Android. Open the app and sign in with your Adobe ID. 3. Tap Brushes from the top menu. Create a custom brush: 1. Tap Brushes from the menu. 2. Tap the image icon at the bottom, then tap Camera Roll. 3. Choose an image from your Camera Roll. 4. Tap areas to erase unwanted marks. Tap the checkmark. 5. Drag the resize handles (white dots) to position the blue box around the part of the image you want to use as the brush. 6. Tap Styles from the main menu. Tip: For the example in the video, we chose a style in the Photoshop CC & Adobe Sketch Brushes section. 7. Tap Presets. Adjust the Size, Spacing, and other settings as you like. Tap Done, or the right arrow on Android devices. 8. Choose the appropriate Creative Cloud Library. Tap Save. Apply style in Adobe Photoshop CC: 1. Open artwork in Photoshop. 2. Choose the Brush tool. 3. Choose your new brush from the Libraries panel (Window – Libraries). 4. Use the new brush to enhance your creation. That's it! To learn more about Adobe Capture and Adobe's other mobile apps, visit our Mobile apps Tutorials page. Subscribe: https://www.youtube.com/user/adobecreativecloud?sub_confirmation=1 LET’S CONNECT Facebook: http://facebook.com/adobecreativecloud Twitter: http://twitter.com/creativecloud Instagram: http://www.instagram.com/adobecreativecloud/ Adobe Creative Cloud gives you the world's best creative apps so you can turn your brightest ideas into your greatest work across your desktop and mobile devices.

Bring Dull Photos to Life Using Lightroom CC | Adobe Creative Cloud

Learn how to enhance sharpness, detail, and textures using Clarity and Dehaze sliders in Lightroom CC. Download sample files and learn more about image editing techniques in Lightroom: https://adobe.ly/2wbDUS0 Subscribe: https://www.youtube.com/user/adobecreativecloud?sub_confirmation=1 LET’S CONNECT Facebook: http://facebook.com/adobecreativecloud Twitter: http://twitter.com/creativecloud Instagram: http://www.instagram.com/adobecreativecloud/ Adobe Creative Cloud gives you the world's best creative apps so you can turn your brightest ideas into your greatest work across your desktop and mobile devices.

Comments

comments