Home Graphic Photoshop Create an Amazing Cracked Skin Effect in Photoshop (Part 2)

Create an Amazing Cracked Skin Effect in Photoshop (Part 2)

Creating a Cracked Skin Effect
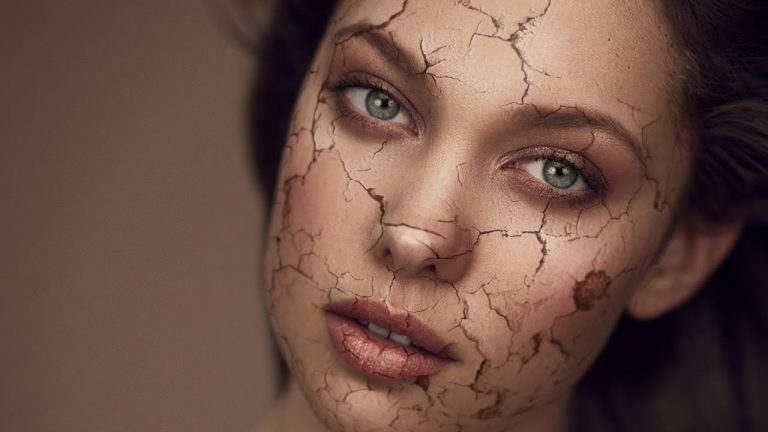
In this episode we finish adding a cracked skin effect to a photo, making it look more three-dimensional and adding blur. Be sure to check out Part 1 where you will learn how to wrap the texture around a subject’s face.

How to Give the Cracks Dimension
To apply the cracks in the first part of this tutorial we used the Multiply blend mode, making the darks interact with the photo and the lights invisible. Now we want to add highlights on the edges of the cracks to give them more dimension. We do this by duplicating the original crack layer, inverting and desaturating it, and changing the blend mode to Screen. Now we have have white cracks on a transparent background. Next we use Blend If to make this layer invisible where the underlying layer is darker, removing it from the cracks. This section of the tutorial is pretty complex but will make a huge difference in the final effect. Next step is to move this layer so it matches the lighting on the original photo.

Create a Peeling Effect on the Cracks
Next step is to make the skin look like it is peeling up in some places just as paint would. To do this we use a soft edged brush, painting white on a Soft Light layer. Painting around the cracks and the using the lasso tool to remove the highlights from unwanted areas makes the skin look as thought it is peeling up. After creating the highlights we do the same thing with the shadows, painting black on a soft light layer. In this tutorial we cover a small part of the image because of time restrictions.

Add a Blur to Blend into the Image
The original image was photographed using a shallow depth of field meaning that some of the face is in focus and some of the face is out of focus. To complete our cracked skin effect we have to duplicate this gradual blur. To match the blur we use the Blur Tool on a new layer. Be sure to check the option “Sample All Layers” and set your strength to about 50%. This will allow you to add the blur on a new blank layer, not effecting the layers underneath.

———————————————————————————————–

Thanks for watching our free Phlearn Tutorials! If you enjoyed this video be sure to subscribe to our channel to receive free weekly videos.

Subscribe: http://goo.gl/LBIEQU

For more advanced Photoshop Tutorials be sure to check out our Phlearn PRO Tutorials. We offer the best Photoshop tutorials available online starting at just $14.99.
http://phlearn.com/pro-tutorials

———————————————————————————————–

Website: http://phlearn.com
Facebook: https://www.facebook.com/Phlearn
Google+: https://plus.google.com/u/0/116791098…

Comments

comments

Latest articles

Easy Ways to Select Artwork in Illustrator | Adobe Creative Cloud

Explore a variety of methods for making selections in your projects to make creating and editing faster and easier in Adobe Illustrator. To download the sample files and learn more about Artwork selection methods, click on https://adobe.ly/2AXMTv1 Subscribe: https://www.youtube.com/user/adobecreativecloud?sub_confirmation=1 LET’S CONNECT Facebook: http://facebook.com/adobecreativecloud Twitter: http://twitter.com/creativecloud Instagram: http://www.instagram.com/adobecreativecloud/ Adobe Creative Cloud gives you the world's best creative apps so you can turn your brightest ideas into your greatest work across your desktop and mobile devices.

Transform Artwork Freely in Illustrator Using Puppet Warp | Adobe Creative Cloud

Learn how to transform artwork using the Puppet Warp and Free Transform tools in Adobe Illustrator. To download the sample files and explore more tutorials on Artwork selection in Illustrator, go to https://adobe.ly/2vul87Y Subscribe: https://www.youtube.com/user/adobecreativecloud?sub_confirmation=1 LET’S CONNECT Facebook: http://facebook.com/adobecreativecloud Twitter: http://twitter.com/creativecloud Instagram: http://www.instagram.com/adobecreativecloud/ Adobe Creative Cloud gives you the world's best creative apps so you can turn your brightest ideas into your greatest work across your desktop and mobile devices.

How to Make a Custom Brush with Adobe Capture CC | Adobe Creative Cloud

Create a brush from a simple sketch. Start from scratch, or download practice files [https://learndownload.adobe.com/pub/learn/mobile-apps/make-a-custom-brush.zip] for a head start. Steps below. Prep your project: 1. Save the practice image (source-image.jpg) provided here to the Camera Roll on your mobile device, or use your own. 2. Download the Adobe Capture CC mobile app from the App Store for your iOS device, or from the Play Store for you Android. Open the app and sign in with your Adobe ID. 3. Tap Brushes from the top menu. Create a custom brush: 1. Tap Brushes from the menu. 2. Tap the image icon at the bottom, then tap Camera Roll. 3. Choose an image from your Camera Roll. 4. Tap areas to erase unwanted marks. Tap the checkmark. 5. Drag the resize handles (white dots) to position the blue box around the part of the image you want to use as the brush. 6. Tap Styles from the main menu. Tip: For the example in the video, we chose a style in the Photoshop CC & Adobe Sketch Brushes section. 7. Tap Presets. Adjust the Size, Spacing, and other settings as you like. Tap Done, or the right arrow on Android devices. 8. Choose the appropriate Creative Cloud Library. Tap Save. Apply style in Adobe Photoshop CC: 1. Open artwork in Photoshop. 2. Choose the Brush tool. 3. Choose your new brush from the Libraries panel (Window – Libraries). 4. Use the new brush to enhance your creation. That's it! To learn more about Adobe Capture and Adobe's other mobile apps, visit our Mobile apps Tutorials page. Subscribe: https://www.youtube.com/user/adobecreativecloud?sub_confirmation=1 LET’S CONNECT Facebook: http://facebook.com/adobecreativecloud Twitter: http://twitter.com/creativecloud Instagram: http://www.instagram.com/adobecreativecloud/ Adobe Creative Cloud gives you the world's best creative apps so you can turn your brightest ideas into your greatest work across your desktop and mobile devices.

Bring Dull Photos to Life Using Lightroom CC | Adobe Creative Cloud

Learn how to enhance sharpness, detail, and textures using Clarity and Dehaze sliders in Lightroom CC. Download sample files and learn more about image editing techniques in Lightroom: https://adobe.ly/2wbDUS0 Subscribe: https://www.youtube.com/user/adobecreativecloud?sub_confirmation=1 LET’S CONNECT Facebook: http://facebook.com/adobecreativecloud Twitter: http://twitter.com/creativecloud Instagram: http://www.instagram.com/adobecreativecloud/ Adobe Creative Cloud gives you the world's best creative apps so you can turn your brightest ideas into your greatest work across your desktop and mobile devices.

Comments

comments