Home Graphic Photoshop How to Make a Kick Ass Lightning Background in Photoshop

How to Make a Kick Ass Lightning Background in Photoshop

The step and repeat command is one of the coolest secrets Photoshop has to offer. You won’t need this feature every time you open Photoshop, but when you are creating patterns, there is no better tool.
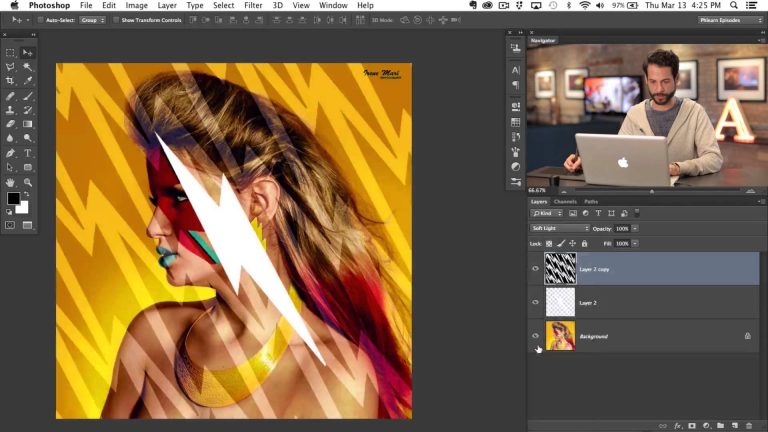
To start the Step and Repeat simply create a shape on a blank layer, in this case we chose to use a lightning bolt. Next make a selection from the shape by holding CTRL/CMD and clicking on the layer thumbnail. This will make sure that each repetition is on the same layer.
After you have made your selection press OPTN+CMD+T to start the transformation. Free transform your layer by rotating, scaling or skewing. When you are done transforming hit ENTER to apply the transformation. At this point you should have 2 of your shape.
To create multiple copies that all have the same transformation, hit CMD+OPTN+SHIFT+T. Each time you complete the keyboard shortcut you will repeat the previous step, this making a Step and Repeat.

If you thought this episode was great our “Pro Tutorials” are about 10 times better, more in-depth detailed information, and are priced perfectly for the photographers and photoshoppers wanting to become the best. Of course we teach it the right way, you just have to get access to the lesson check out http://phlearn.com/pro-tutorials.

Make sure to subscribe to our Youtube channel for great videos, hangout with us on Google+, like us on Facebook, chat on Twitter, and capture moments on Instagram. All of our accounts have something fun to offer.

Phlearn Accounts
Website: http://phlearn.com
Youtube: https://www.youtube.com/channel/UC47XN5bhLTBH5TRFyKaUpKg
Facebook: https://www.facebook.com/Phlearn
Twitter: https://twitter.com/phlearn
Google+: https://plus.google.com/u/0/116791098…
Instagram: https://instagram.com/phlearn

Comments

comments

Latest articles

Easy Ways to Select Artwork in Illustrator | Adobe Creative Cloud

Explore a variety of methods for making selections in your projects to make creating and editing faster and easier in Adobe Illustrator. To download the sample files and learn more about Artwork selection methods, click on https://adobe.ly/2AXMTv1 Subscribe: https://www.youtube.com/user/adobecreativecloud?sub_confirmation=1 LET’S CONNECT Facebook: http://facebook.com/adobecreativecloud Twitter: http://twitter.com/creativecloud Instagram: http://www.instagram.com/adobecreativecloud/ Adobe Creative Cloud gives you the world's best creative apps so you can turn your brightest ideas into your greatest work across your desktop and mobile devices.

Transform Artwork Freely in Illustrator Using Puppet Warp | Adobe Creative Cloud

Learn how to transform artwork using the Puppet Warp and Free Transform tools in Adobe Illustrator. To download the sample files and explore more tutorials on Artwork selection in Illustrator, go to https://adobe.ly/2vul87Y Subscribe: https://www.youtube.com/user/adobecreativecloud?sub_confirmation=1 LET’S CONNECT Facebook: http://facebook.com/adobecreativecloud Twitter: http://twitter.com/creativecloud Instagram: http://www.instagram.com/adobecreativecloud/ Adobe Creative Cloud gives you the world's best creative apps so you can turn your brightest ideas into your greatest work across your desktop and mobile devices.

How to Make a Custom Brush with Adobe Capture CC | Adobe Creative Cloud

Create a brush from a simple sketch. Start from scratch, or download practice files [https://learndownload.adobe.com/pub/learn/mobile-apps/make-a-custom-brush.zip] for a head start. Steps below. Prep your project: 1. Save the practice image (source-image.jpg) provided here to the Camera Roll on your mobile device, or use your own. 2. Download the Adobe Capture CC mobile app from the App Store for your iOS device, or from the Play Store for you Android. Open the app and sign in with your Adobe ID. 3. Tap Brushes from the top menu. Create a custom brush: 1. Tap Brushes from the menu. 2. Tap the image icon at the bottom, then tap Camera Roll. 3. Choose an image from your Camera Roll. 4. Tap areas to erase unwanted marks. Tap the checkmark. 5. Drag the resize handles (white dots) to position the blue box around the part of the image you want to use as the brush. 6. Tap Styles from the main menu. Tip: For the example in the video, we chose a style in the Photoshop CC & Adobe Sketch Brushes section. 7. Tap Presets. Adjust the Size, Spacing, and other settings as you like. Tap Done, or the right arrow on Android devices. 8. Choose the appropriate Creative Cloud Library. Tap Save. Apply style in Adobe Photoshop CC: 1. Open artwork in Photoshop. 2. Choose the Brush tool. 3. Choose your new brush from the Libraries panel (Window – Libraries). 4. Use the new brush to enhance your creation. That's it! To learn more about Adobe Capture and Adobe's other mobile apps, visit our Mobile apps Tutorials page. Subscribe: https://www.youtube.com/user/adobecreativecloud?sub_confirmation=1 LET’S CONNECT Facebook: http://facebook.com/adobecreativecloud Twitter: http://twitter.com/creativecloud Instagram: http://www.instagram.com/adobecreativecloud/ Adobe Creative Cloud gives you the world's best creative apps so you can turn your brightest ideas into your greatest work across your desktop and mobile devices.

Bring Dull Photos to Life Using Lightroom CC | Adobe Creative Cloud

Learn how to enhance sharpness, detail, and textures using Clarity and Dehaze sliders in Lightroom CC. Download sample files and learn more about image editing techniques in Lightroom: https://adobe.ly/2wbDUS0 Subscribe: https://www.youtube.com/user/adobecreativecloud?sub_confirmation=1 LET’S CONNECT Facebook: http://facebook.com/adobecreativecloud Twitter: http://twitter.com/creativecloud Instagram: http://www.instagram.com/adobecreativecloud/ Adobe Creative Cloud gives you the world's best creative apps so you can turn your brightest ideas into your greatest work across your desktop and mobile devices.

Comments

comments